 |
 |
 |
| |
|
|
Begin by opening Paint Shop Pro.
Now go to openclipart, locate the medal called "Blank Award of Medal and Achievement" and do a screen capture by pressing
the "Alt' and "PrntScr" keys at the sane time.
Return to Paint Shop Pro and access the screen capture by pressing the "Ctrl" and "v" keys at the same time; this
will show you the screen print you just captured at the openclipart website.
 Image selection tool
|
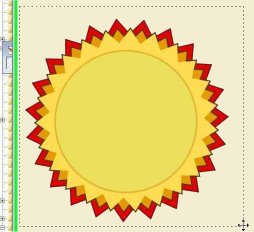
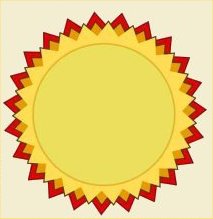
Now it's time to trim your image. Select the "Selection tool". Be sure the "Tool Options Window" is showing "rectangle" (if the tool options window isn't showing, press the Toggle Tool Options Window button.). Now draw a box around the medal with the selection tool by - beginning in the upper left-hand corner - pressing and holding down the left-hand mouse button and dragging the mouse down and to the right so that the selected area expands until it includes the entire medal. Your selection should look like the image on the top left, with the medal surrounded by a box of "marching ants". Now press the "Shift" and "r" keys at the same time; this will result in your page being trimmed so that all that's left is the medal (the image on the bottom left). |
You will notice that the medal has four major colors and an outline color. We don't care about the outline color, but we
do care about the two colors in the center. Using the dropper tool, sample the color in the outer yellowish
ring
( ) and right-click so that this color is established as the background color. Now select the
flood fill tool and set the parameters in the Tool Options window as follows: Blend mode: normal; match mode: RGB value;
tolerance: 51; opacity: 100%; sample mergeed. Now press the right-hand mouse button and flood-fill the center with the
color from the outer ring. Now the entire top portion of the medal is the color of the outer yellowish ring.
This is critical for the "gold foil" step later on.
) and right-click so that this color is established as the background color. Now select the
flood fill tool and set the parameters in the Tool Options window as follows: Blend mode: normal; match mode: RGB value;
tolerance: 51; opacity: 100%; sample mergeed. Now press the right-hand mouse button and flood-fill the center with the
color from the outer ring. Now the entire top portion of the medal is the color of the outer yellowish ring.
This is critical for the "gold foil" step later on.
For this step you'll use the Preset Shapes( ) tool. Make sure
the Tool Options window shows these parameters:The shape should be a circle, and "retain style" and "create as vector" should
be checked.
) tool. Make sure
the Tool Options window shows these parameters:The shape should be a circle, and "retain style" and "create as vector" should
be checked.
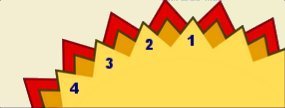  |
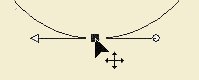
With your blank medal displayed,
count the top four rays right to left,as shown at left (don't actually number the rays). With the Preset Shapes tool selected, place the cursor
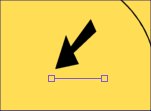
near the bottom of the triangle of ray 4 and, holding down the "Shift" key and the left mouse button,
drag the mouse down and to the right to create a circle. Stop when the vector deformation box (the
square around the circle) is just touching the bottoms of the triangles (see image at right). Now press the
"Ctrl" and "d" keys at the same time to remove the vector deformation box and see where your cirle
lies within the medal. If you don't like it, press the "Ctrl" and "z" keys at the same time; this will
restore the vector deformation box. At this time you will be able to move the
circle to any location you choose so that it looks more centered. To do this, you need to grab the "handle"
in the center of the circle; when your cursor is over this box the cursor will change shape and you will be able to
drag the circle around until it's where you want it. No matter what, make sure the vector deformation box is
showing when you're done.
Believe it or not, that was the toughest part of this whole medal-making process. | 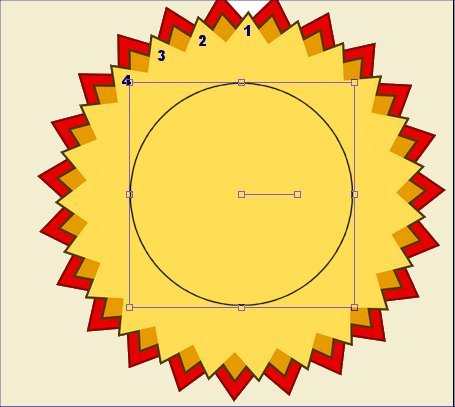 |
Select the text tool ( ) and place it along the circle until it changes from the regular text tool
to the vector text tool (
) and place it along the circle until it changes from the regular text tool
to the vector text tool ( ).
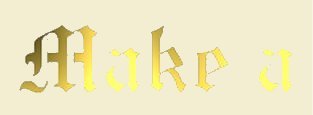
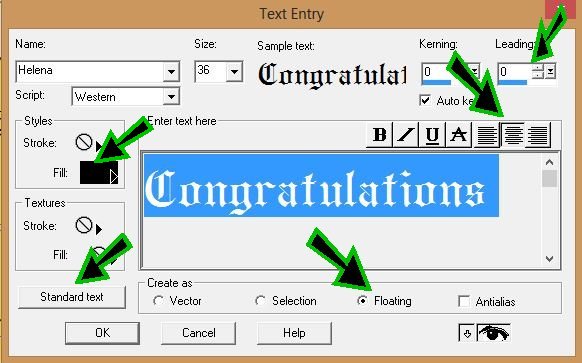
Now choose a classy-looking font (I chose Helena), set the size to 36, and type your text. When entering your text, be sure the FILL color
is "black", that Antialias and Floating are checked, that Kearning and Leading are
set to zero, and that the Text alignment option is set to Centered. Click "Standard text", then click "Ok".
Your text will automatically center itself along the upper arc of the circle.
).
Now choose a classy-looking font (I chose Helena), set the size to 36, and type your text. When entering your text, be sure the FILL color
is "black", that Antialias and Floating are checked, that Kearning and Leading are
set to zero, and that the Text alignment option is set to Centered. Click "Standard text", then click "Ok".
Your text will automatically center itself along the upper arc of the circle.
 Object Selector tool If you want to place text along the bottom of the circle, we
introduce you to a new tool: the Object Selector tool. To begin placing text along the bottom of
the circle, select the Object Selector tool and move it over the bottom node (small square box) on the vector
deformation box. Right-click your mouse and select "Node edit from the menu. A spear will
appear, piercing the bottom node and the cursor will change appearamce again. Now right-click the mouse
and select Edit; a slide-out menu will appear. Directly across from Edit will be Reverse
path; select that.
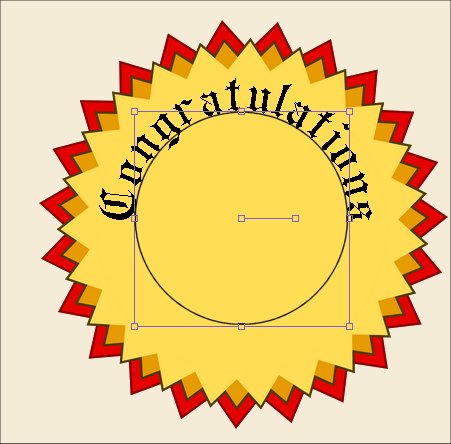
| Now select the text tool again, and place the cursor along the circle until the Vector text cursor appears. Click and the text entry window will open. Enter your text as before -BUT- click in the "Leading" window (in the upper right-hand corner of the text entry window) and enter "19". This will cause the new text to appear directly over top of the existing text -the only problem is that it will be upside down and backwards. To get the text to the bottom of the circle and to make it appear correctly, use the Text tool cursor to grab it and drag it toward the bottom of the circle (hover the cursor over the outlined tet; it will change shape to a four-sided arrow). Grab the text and drag it down toward the bottom of the circle. With the text still selected (outlined by "marcghing ants"), click on the "Image" palette and, from the drop-down menu, select "Flip; this will get the text right-side up. Next, click "Image" again, and, this time. select "Mirror; this will create a mirror image of the text so that ir reads correctly from left to right. Now drag the text to its proper locaion along the bottom of the circle and adjust its positioning until you are satisfied. When the text is in place, press Ctrl and "d" to deselect the text. Press Ctrl and "d" again to remove the vector deforation box. Now go to the Layers palette and, near the bottom, select "Merge/Merge all (flatten)". To add the second circle, repeat the same steps that you did to create the first circle, only make this circle smaller. Once again, use the vector curcor to grab the handle in the middle of the circle to move the circle around to where you want it, then repeat the process of merginf (flattening) the layers to remove the vector deformation box. To add a monogram, simply use the Text tool and select any font you wish to use to place the letters in the center of the inner circle. The font I selected is Chopin Script set to 48 points. |
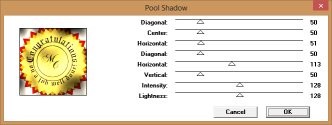
To create the impression of a shiny gold foil medal you will need Greg's Pool Shadow zip file from Hypergurl. Download the pool shadow filter and move it to your plugins file The path for your plugins folder should be something like: C:?Program files(x86)/Jasc Software Inc./Plugins. Simply copy the unzipped fil to the Plugins folder. Tou will also need a .dll file named msvcrt10.dll to be sure the plugin functions. This file should be in your Windows\System32 folder;if it isn't, go to The Plugin Site and follow the instructions to download and install it.
The first thing you need to do (after you've done the above) is highlight EVERYWHERE on the medal where the pool filter - I mean gold foil - is supposed to affect. To do this, select the Magic Wand tool and start clicking away! Hold down the left mouse buttom and the "Shift' keys together and click every space on the medal; you will see marching ants everywhere you click. When you have selected everything you want to (be sure to include closed spaces like the inside loops of "o"s, "p"s,"8"s, etc.), click on the Effects palette, go to the bottom under "Plug-in filters" and select "Greg's Factory Output Vol II" and select Pool shadow filter". From the top, set the values of each slider as follows: 50; 50; 51; 50; 113; 50; 128 and 128, then press "Ok".
hit counter
Last updated 5:47 p.m. Sunday, October 16, 2016